There are multiple cartridges used on Roman Tub faucets. Confirming which one you are working with will require removing the handle and identifying your handle mechanism. If these requirements have not yet been confirmed, see Roman Tub Deck Mount: Lever or Roman Tub Deck Mount: Knob for details at solutions.moen.com.
Preparation:
| Determine Assembly Type: Choose your assembly type from the three versions below before you begin the cartridge removal instructions. |
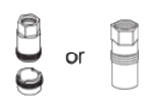
| White Adapter with White Hex Nut |
With the water supply off. Unthread the white hex nut (#4) and compare your version with the image below. If you have the two piece version, go to Cartridge Nut and Cartridge Removal: Disassembly. If you have the single piece version, go to step 2 in Cartridge Nut and Cartridge Removal: Disassembly.
| White Adapter with Chrome Nut |
With the water supply off, unthread the chrome nut, remove the white adapter, unscrew the Phillips head screw and lift out the white stem extension. Move to Cartridge Nut and Cartridge Removal: Disassembly
| Stem Extension- Fully Splined Exterior (colors may vary) |
With the water supply off, use a Phillips screwdriver to unthread the Phillips screw. Lift out the splined stem extension. Move to Cartridge Nut and Cartridge Removal: Disassembly.
| Cartridge Nut and Cartridge Removal: The Cartridge Nut can be removed using either a Moen Removal Tool 14272 or Needle Nose Pliers |
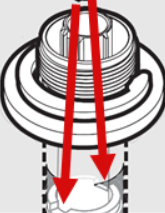
This image illustrates the location and the points of contact that the tool will need to make. The nut is threaded so the tool will need to be rotated counter clockwise to remove it.
Using Removal Tool 14272
Disassembly:
It is recommended to clean and flush the valve body, see article Valve Body Cleaning and Flushing.
Assembly:
Using Needle-Nose Pliers
Disassembly:
It is recommended to clean and flush the valve body, see article Valve Body Cleaning and Flushing.
Assembly:
For additional information on Roman Tub Fillers visit Roman Tub Deck Mount: Lever or Roman Tub Deck Mount: Knob. For information on other Moen products visit solutions.moen.com and select the type of product you are repairing. The guide will contain repair details, troubleshooting and specific information on assembling handles associated with that style of product.
Still Not Finding What You're Looking For?
Contact Us or Call 1-800-BUY-MOEN